|
Acoustic Research Tool (ART)
v0.10
|
Introduction
This is the top level page of the source code documentation. These pages are the documentation of ART's sources. If you want to contribute to the project you will find useful background information here. Some sections of the user's manual may also bring you to these pages, since some details of ART's functionality are explained here.
If you only want to use ART without extending its functionality, have a look at these pages:
Using the ART command line tool
Using the ART programmer's interface
Overview
The source code can be divided into several units:
- The ART programmer's interface provides simple functions which allow you to build your own simulation applications.
- The ART objects are the objects the programmer's interface is built on. You can also build your own applications by using these objects.
- The ART model interface is being developped to provide an easy way of adding custom models to ART.
- The wave interface standardizes a way of converting different types of waves as they are required by the models.
Enhancing the Acoustic Research Tool
Behind the scenes of ARTInputImpedance
This section was written to give you an idea about how the calculation actually works, which is essential if you plan to integrate your own models in ART.
Do you remember the difference between elements, models and prototypes? Then you might also remember that every element has its own model attached to it and that every model implements the ARTmodelInterface. Now what happens when we call ARTinputImpedance?
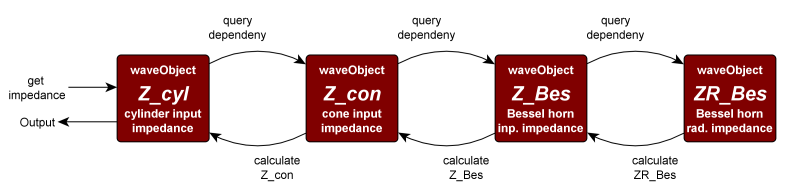
ARTInputImpedance calls the method PrepareCalculation of the specified circuit. That function uses the interface functions of the models of each element to prepare the calculation. The outermost element is queried for its radiation impedance. The radiation impedance is then propagated through all elements until the input impedance at the mouthpiece has been found.
It is important to note that calculation does not take place in this step. In fact, the circuit prepares the calculation by setting up relations between the elements and laying down how the values of all the propagated impedances have to be calculated.
Let's assume we want to calculate the input impedance of a simple model, consisting of a cylinder (the mouth piece) a cone and a Bessel horn at the outer end (the "radiating" end). In our simple model the circuit tells the Besselhorn element to provide a waveobject representing its radiation impedance. This waveobject is still empty when passed to the Besselhorn to get a waveobject representing the propagated impedance. The element only notes which waveobject to propagate when calculation is finally carried out. The new waveobject is passed to the cone, which returns a representation of the propagated impedance, which is again passed on to the cylinder to get the impedance propagated through the last element (or the first, from the player's perspective). This waveobject will contain the input impedance.
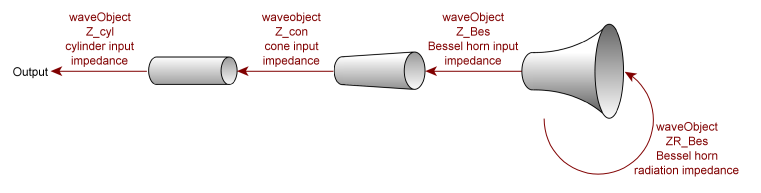
When these relations are set up, the circuit is ready for calculation. The input impedance is queried for its value and since it is not up-to-date, it initiates its own computation. By asking each dependency for its value it initiates their computation. This sets off a chain reaction during which all waveobjects are evaluated, starting from the radiation impedance and ending with the input impedance of the circuit, which was queried in the beginning.
A little but important detail are the waveobjects themselves. Waveobjects contain the wave in some form (as impedance per frequency, as pressure per frequency, as an impulse in the time domain, etc.) and implement the WaveObjectInterface. The interface declares functions which the models can use to ensure the wave is provided in a certain form, the waveobjects need to prepare this conversion.
The calculations themselves are carried out by functionoids. If you are not familiar with the concept of functionoids, imagine them to be deep-frozen function calls. That is, all necessary arguments are passed to a functionoid's constructur. The constructor saves references or pointers to those arguments but does not compute anything. Only when the functionoid's core function (we've called it applyFunction) is called, the calculation is executed.
The reason for introducing these concepts is efficiency. The ART interface was written with different types of applications in mind, and in some, like optimizers, it is common to reevaluate an instrument's input impedance frequently after doing only minor changes. Impedance calculations of whole instruments can be very time consuming, so we want to avoid recalculating values which have no reason to change. If, for example, in our simple example instrument only the length of the cylinder changed, we would not need to recompute the Bessel horn's or the cone's impedance, but only propagate the input impedance at the entrance of the cone through the changed cylinder.
How to implement your own model
To implement your own model, derive a class from ARTmodelInterface and implement the declared functions. If a model is not supposed to support a certain functionality, throw an exception (of type ARTerror) in the function to inform users and programmers, that the requested functionality is not available.
Methods like InputImpedance or RadiationImpedance are supposed to prepare waveobjects for calculation. Therefore, a model must implement the calculation itself in functionoids. Only the constructors of these custom functionoids should be called in the methods derived from ARTmodelInterface.
Look at the models implemented so far (HornElementPrototype_FD and ToneHole) for examples. Both classes are wrappers for other objects of class HornElement and use the HornElement-object's methods to calculate acoustic impedance. Note how the functionoids are used in the two classes.
How to use your own model
To use your own model and make it useable for others, you have to construct a protoype with your model. Set properties of the prototype in its constructor. Check the ToneHole constructor to see an example.
That prototype must be added to the prototpeModels list of the ART root object in the root object's constructor. That is as simple as this:
The prototype will then be available as a template for elements. When the root object is detroyed, the prototype will also be destroyed (properties, objects and methods appended to an ARTobject are always destroyed when the object is destroyed).
If you can not specify all properties of a prototype in its constructor (for example when creating a template class to represent a prototype that will have different properties depending on the template argument) you can add the properties after instantiation of the prototype object in the root object's constructor. The cylinder, for example, is created like that: